Everything You Need To Know To Make Your Own Personalized Copper Christmas Ornament
Project Instructions with Video and Photos below.
Basic Copper Christmas Tree Ornament Kit is available for purchase here
Here are step-by-step instructions to show you how to make your own personalized, copper, Christmas tree ornament. Both the video and the written how-to with photos below, will help show you exactly how to complete this project. This simple project will allow you to explore basic copper foil embossing techniques and can be modified to suit your individual style. The same basic instructions can be adapted to create ornaments of different shapes and designs. You can embellish them however you like to honor a friend, a commemorative date or occasion, a favorite teacher, a personal interest, or you can otherwise design them in unique ways that can make this very special and personal.
Instructions
1) Gather all the materials needed for the project:
Basic Copper Christmas Tree Ornament Kit
This kit includes:
- 5 Mil Copper Foil Sheets- 6” X 7” (4 sheets)
- Ball tipped Embossing stylus
- Paper stump
- Embossing Pad
- Lightweight, wood Christmas tree cut-out
- Bottled Patina Solution in green
- Ornament Hanger
- Ribbon
- Buffing Block
- Other items needed:
- Scissors
- Paper towels
- Glue
- Gloves
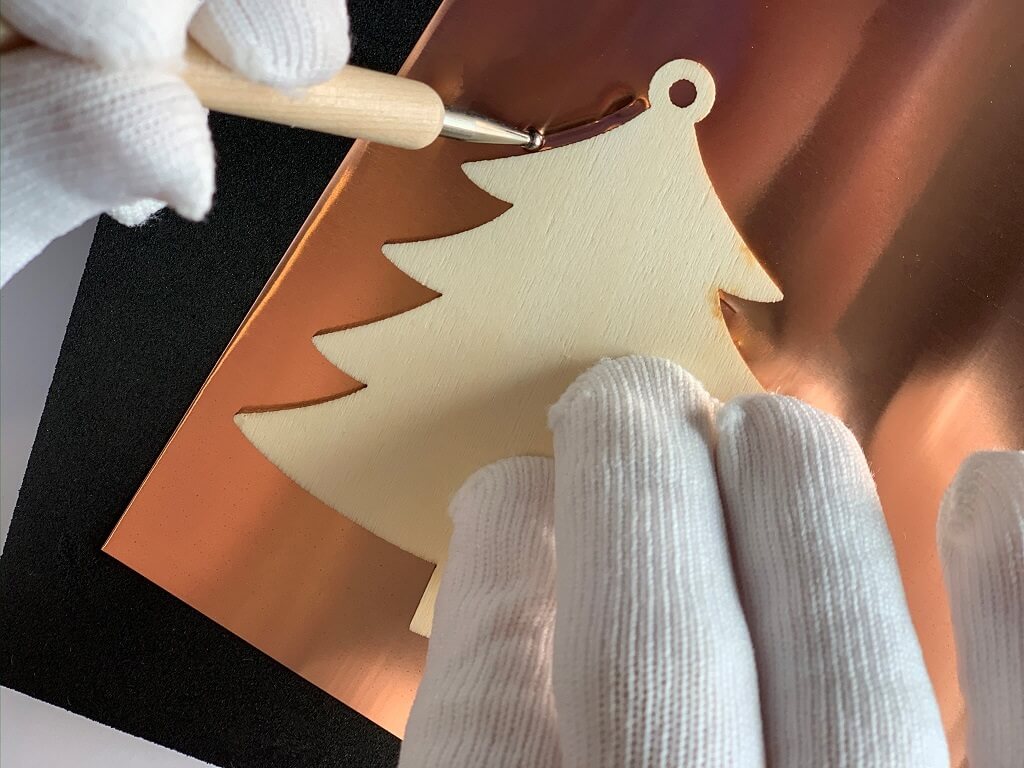
2) Find a flat surface, such as a table, where you can complete the project. Place one of the 5 mil copper foil sheets on top of your embossing pad and place the wooden Christmas tree cut-out on top of the copper. Position the tree to the side so that you can get 4 trees cut from each sheet.
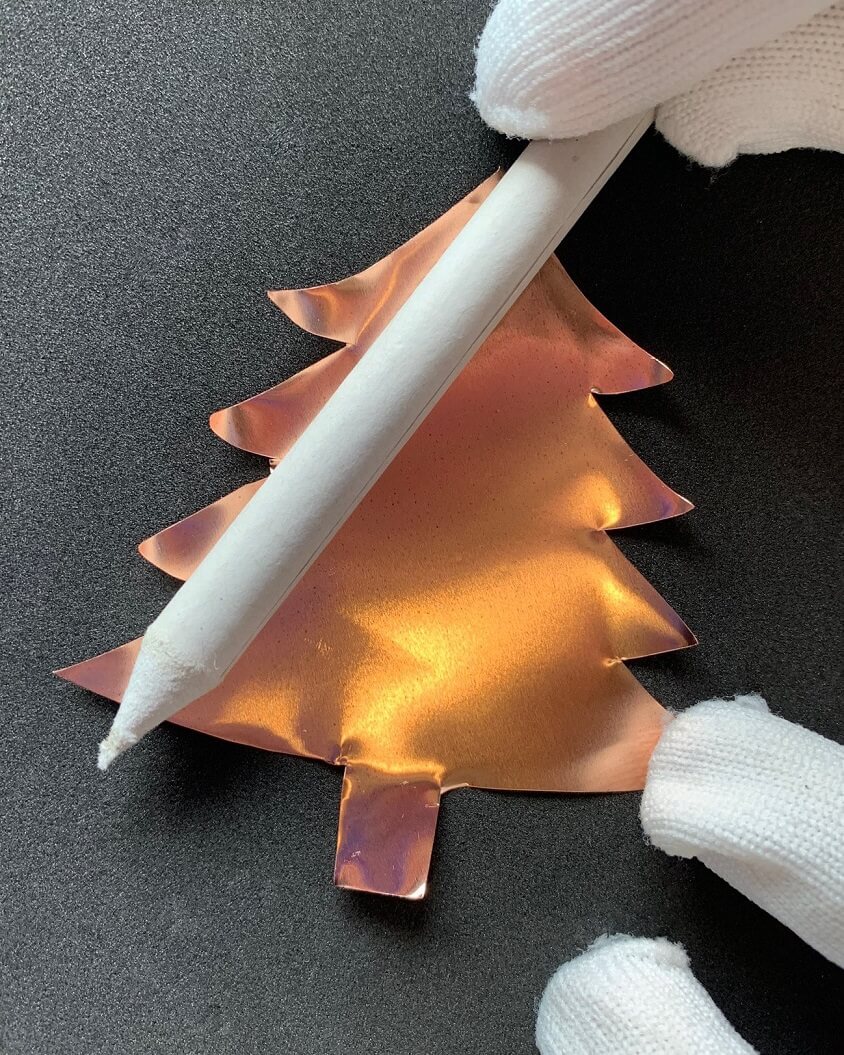
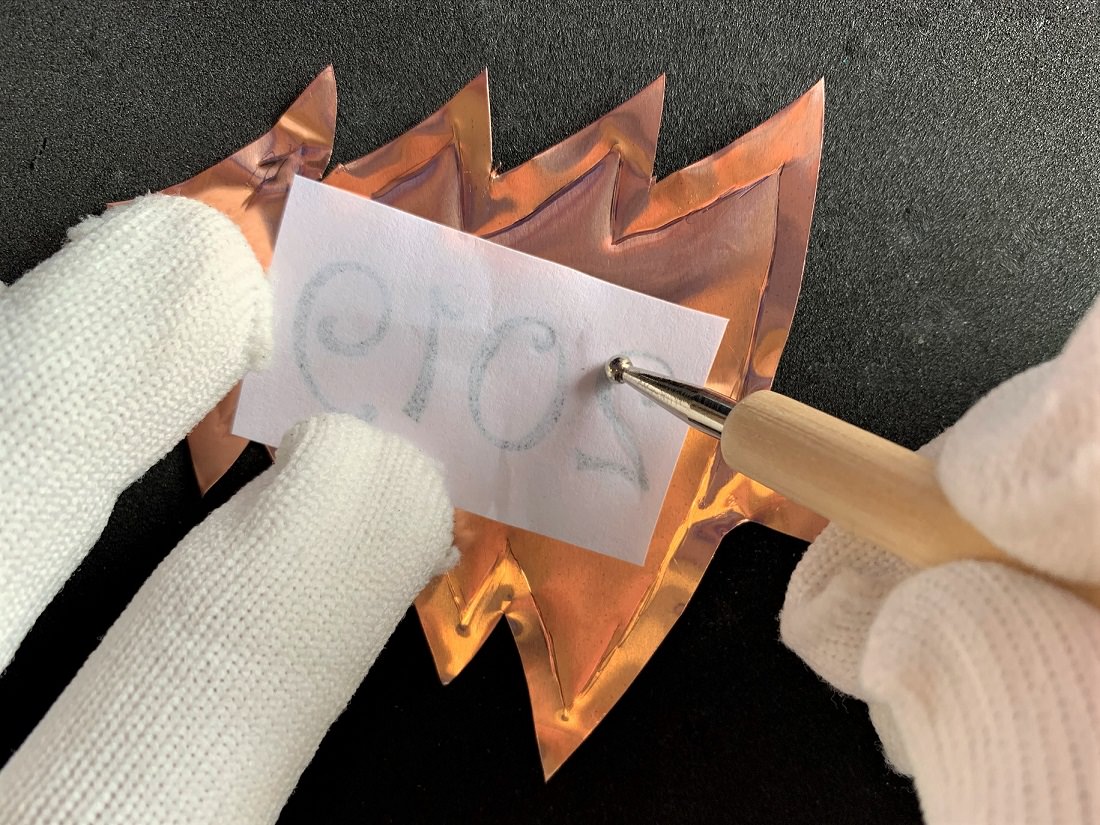
3) Hold the tree in place on top of the copper sheet with one hand, while tracing around the shape onto the copper with the other, using the ball-tipped embossing stylus. Press firmly enough that you will have a clear outline.
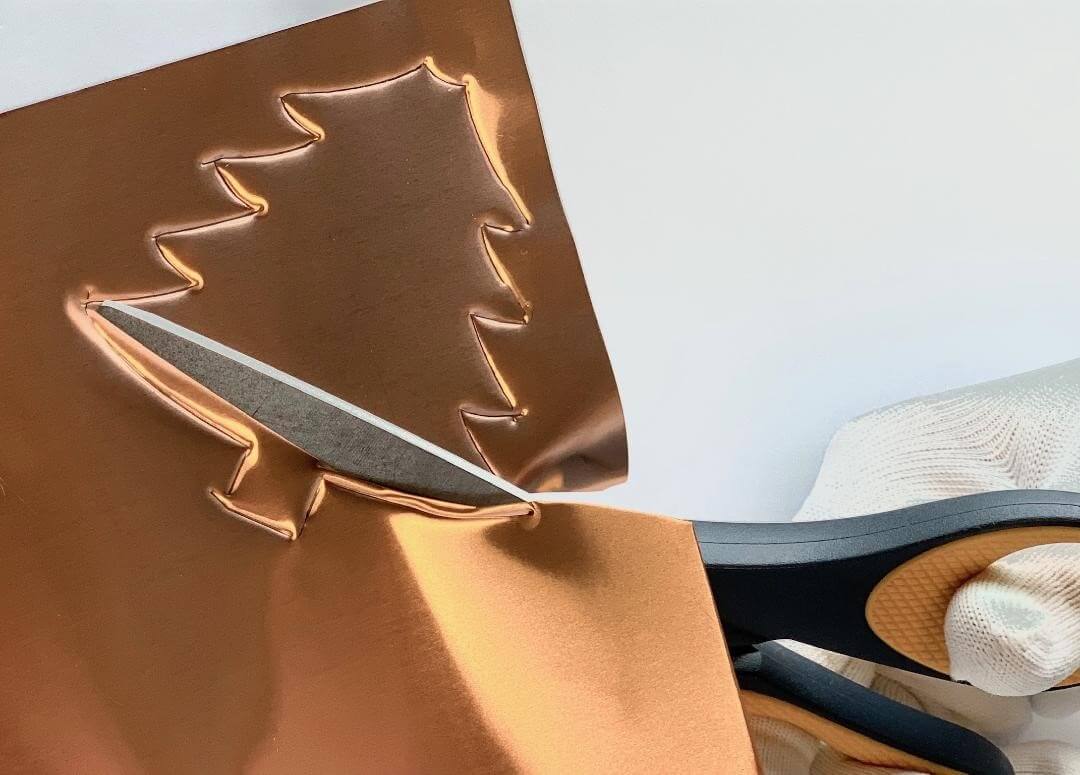
4) Remove the wood tree and cut the tree out of the copper sheet with your scissors. Cut inside the line you have drawn, so that the final tree is slightly smaller than the wood cut-out. This will allow it to sit on top of the wood and not hang over the edges.
5) The edges of the tree will be wrinkled up slightly, so roll the paper stump across the surface to flatten them out.
6) Working from the back of the tree, take the larger end of the embossing stylus and emboss a line into the tree, somewhere around 1/16” away from the outer edge. Outline the entire tree this way.
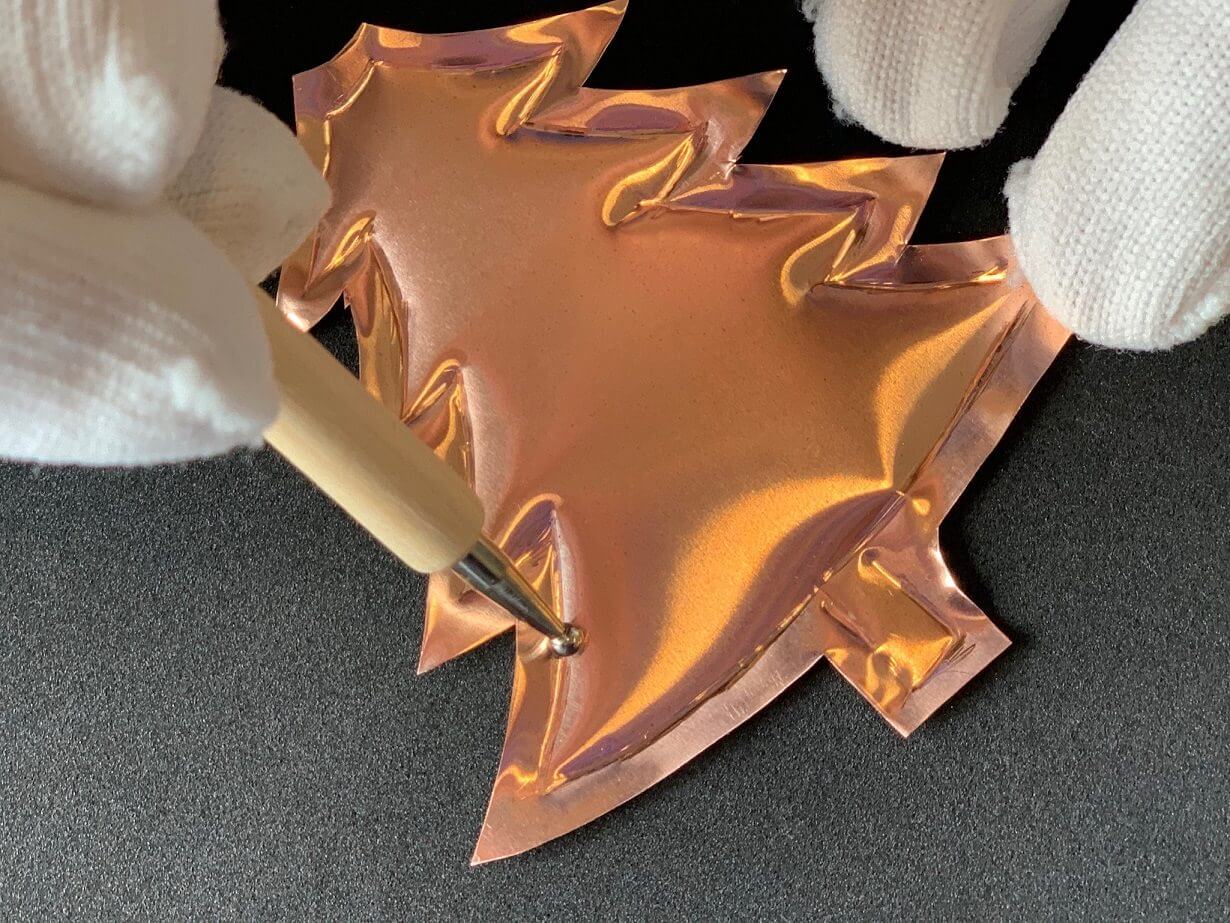
7) Again from the back of the tree, use the larger end of the embossing stylus, and draw branches into the tree.
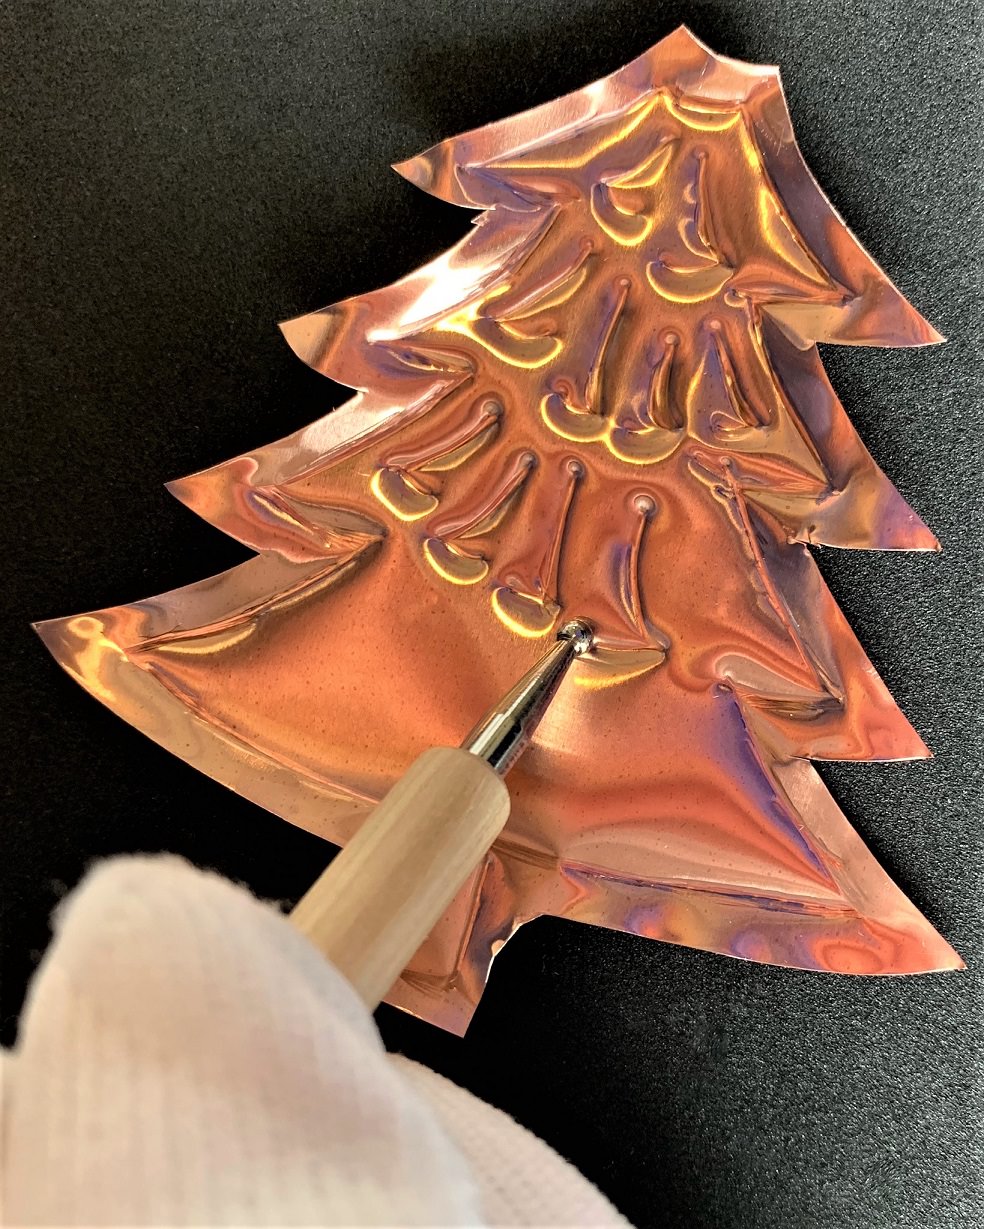
8) Once you have finished, turn the tree over so that you are working on the front. The branches will now be raised up off the copper sheet. Use an end of the paper stump to smooth out the outer edges of the tree. This will help keep them from sticking out and will keep the edge smooth and neat.
9) Continue to use the paper stump to smooth the portions of the tree in between the branches. This will make the branches more prominent. 
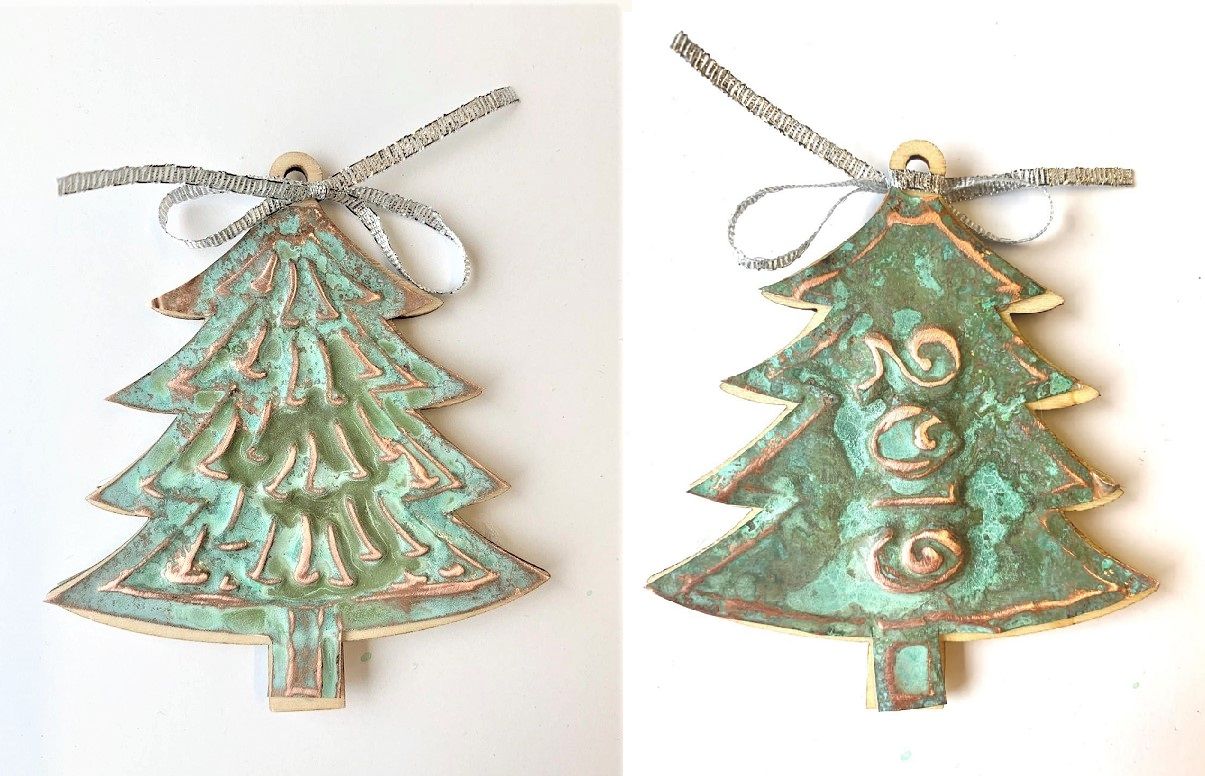
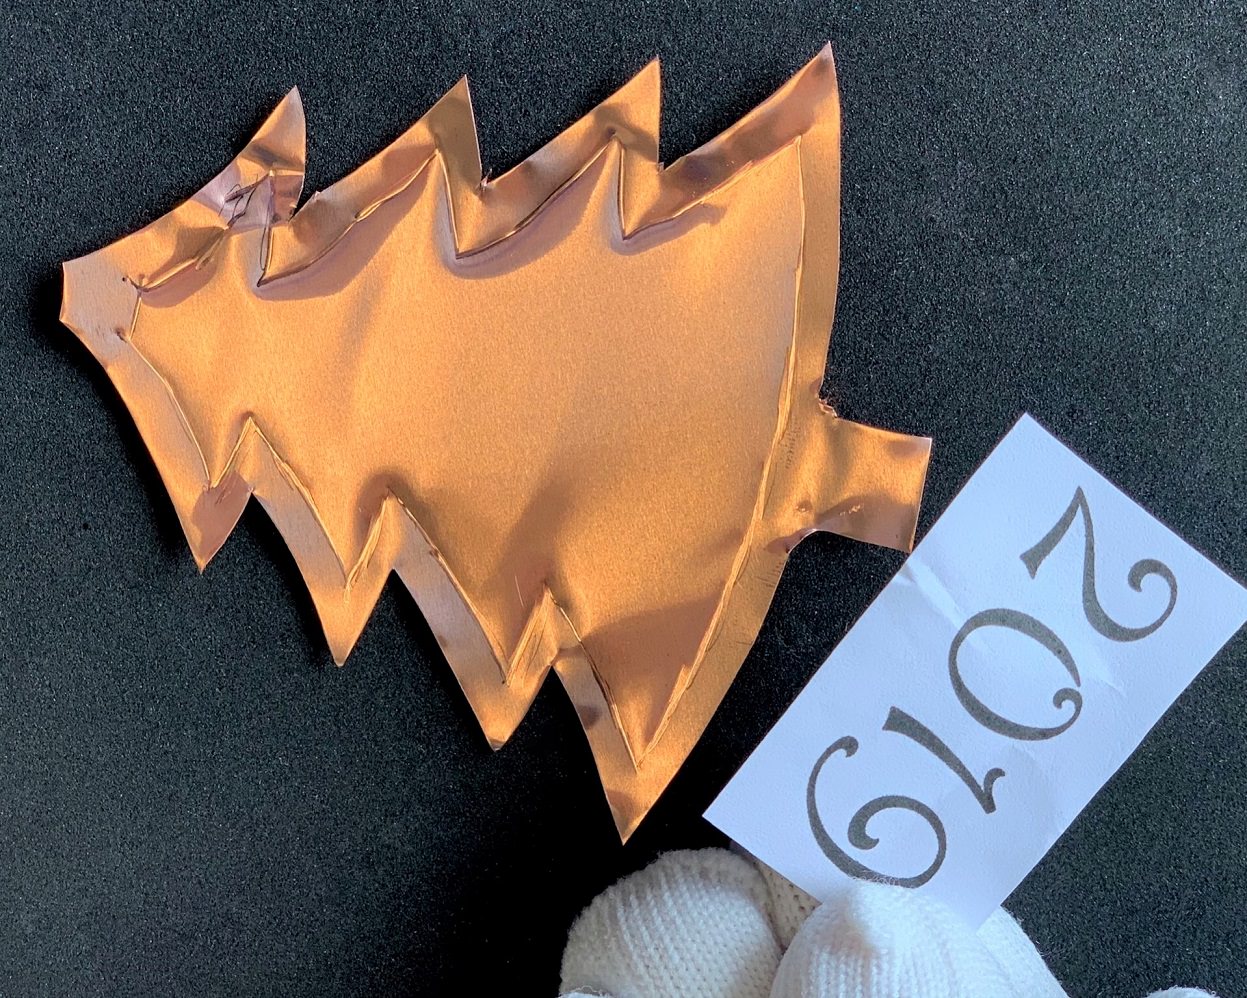
10) For a two-sided tree, repeat steps 1-6 and prepare a second copper tree. You can emboss whatever you like into the back of this tree. You might use a special date, someone’s name or initials, a Christmas message, or design. In this case, we are adding the year. Remember that when you are embossing from the back, you will want to press down into the copper so that it will read correctly from the front. If you are writing a name that will appear straight across the ornament, for example, you would want to write it backwards so when you turn it over it reads correctly.
11) When you have completed your design, use the paper stump again to smooth out the outer edge and the space in between your design or letters.
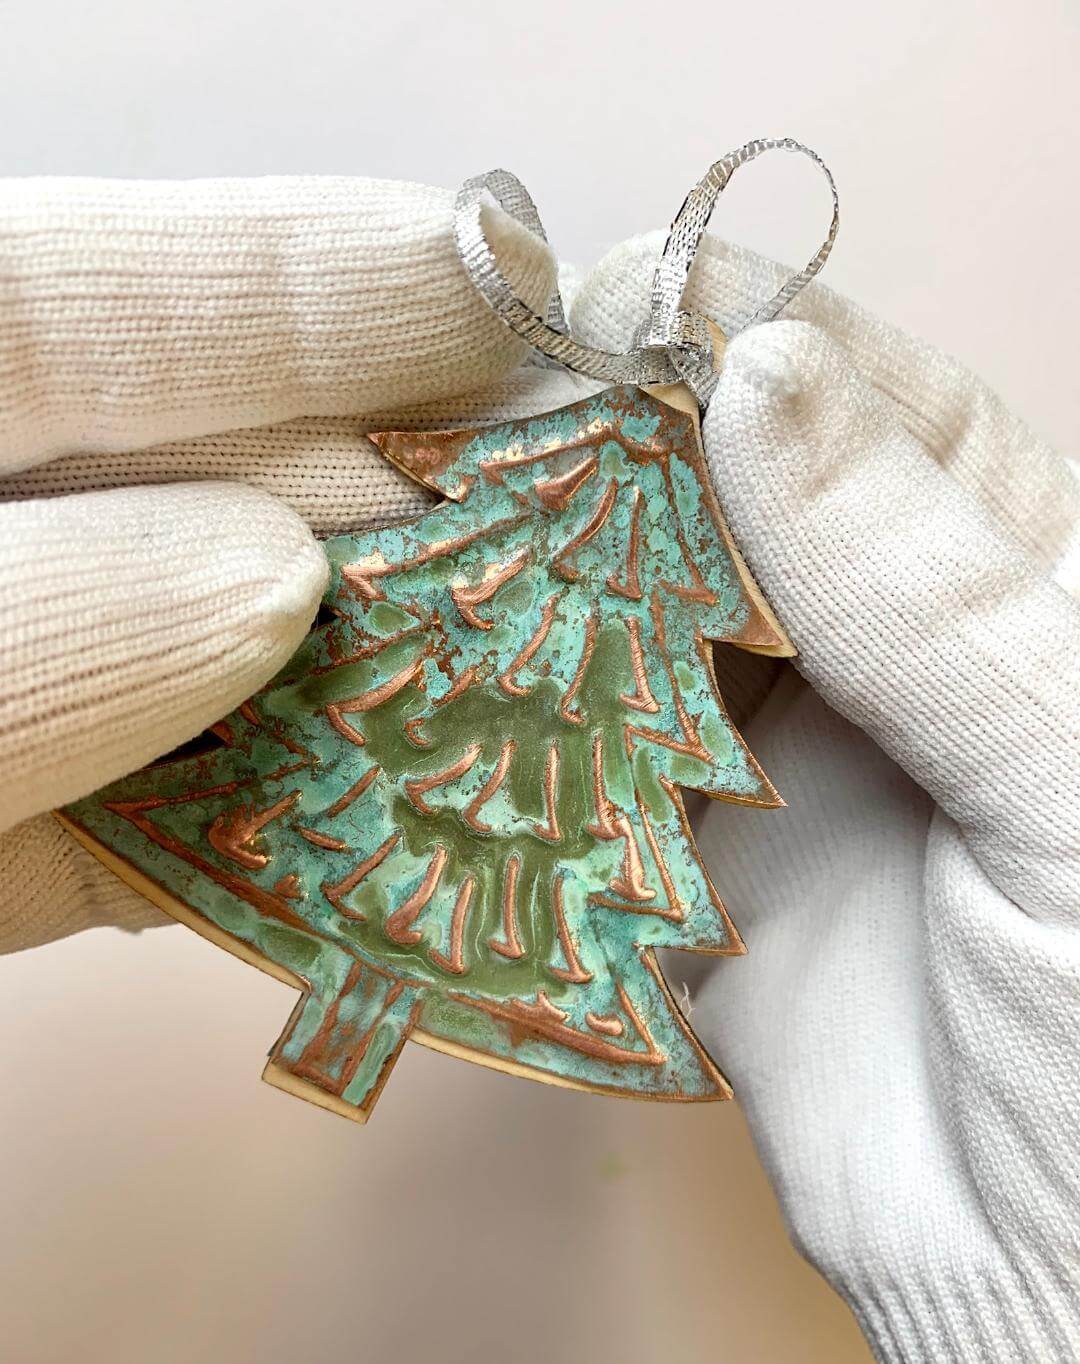
12) Once you are finished embossing your trees, apply the patina solution. Place the trees on a protected surface, and then squirt a little of the solution onto the trees. Be sure to read the information included with the patina solution that explains the cautions you should take when using it, such as protecting your eyes, skin, and avoiding breathing any fumes. You will want to cover the tree with the solution in a fairly thin, even application. If you prefer, you can use a paintbrush or foam brush to apply the patina solution.
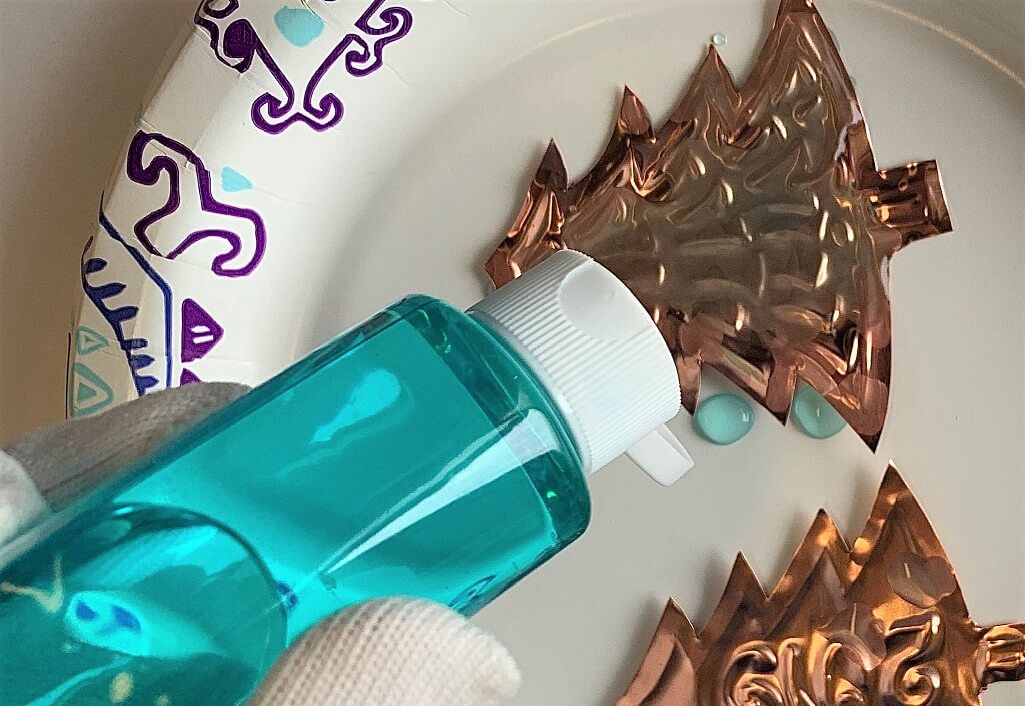
13) You can dab off any solution that is excessive. The patina solution is not a paint, but a chemical solution that speeds up the natural patina process that copper will experience upon exposure. It will begin to change color immediately but will take several hours to develop the color in full. You may want to leave the trees overnight to allow the color to develop fully and to let it dry as well.

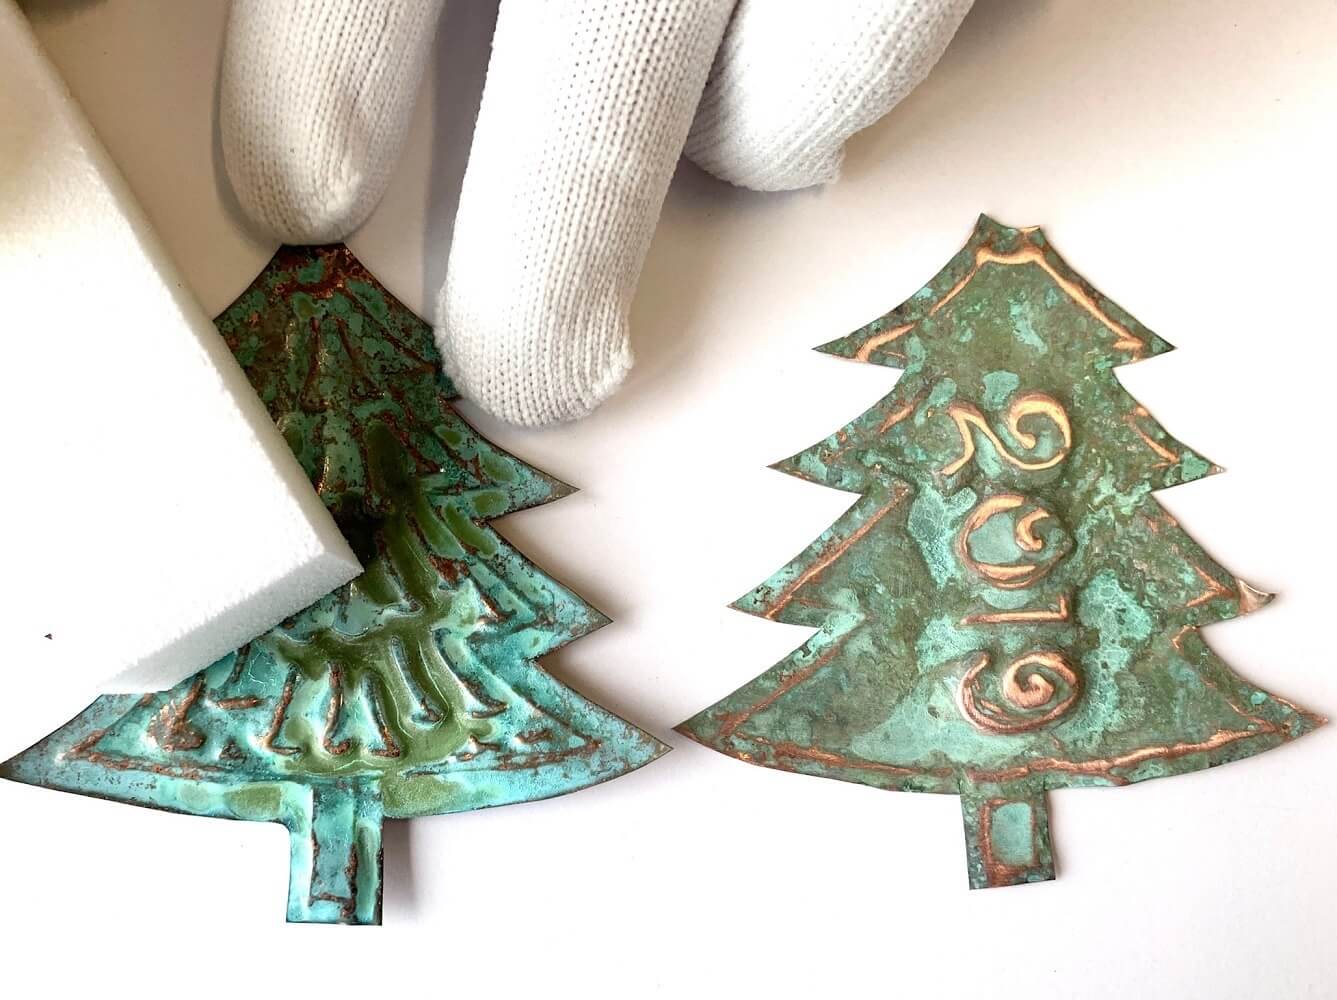
14) Once the color has developed and the copper is dry, use the buffing block to remove a little of the patina solution where the branches and other embossed areas are raised from the copper surface. This will make those designed areas stand out more by allowing some of the original copper color to show through. Rub lightly so you don’t remove too much.
15) Assemble the ornament by attaching the copper trees to the wooden cut-out trees. Hot glue works quickly, but it does briefly make the copper very warm to the touch. You can also use Elmer's glue or contact cement.

16) Once assembled, you have the option to spray on a clear coat of sealant.
17) The last step is to attach a ribbon (either by tying around the neck of the tree or by gluing it on) and ornament hanger.